Adding the GA4 tracking code to your website is the crucial first step to collecting visitor data—but it’s not always obvious where that code belongs or how to install it correctly.
Quick answer: The GA4 tracking code goes in the <head> section of every page on your website, right before the closing </head> tag. You can add it manually by editing your site’s HTML files, or by using Google Tag Manager for easier long-term management.
In this guide, you’ll learn exactly where to add Google Analytics code for maximum accuracy, how to get your GA4 tracking code from Google Analytics, how to install it on your website, and how to verify everything is working correctly.
Understanding the GA4 Tracking Code
The GA4 tracking code is a snippet of JavaScript that collects visitor data from your website and sends it to your Google Analytics 4 property. When someone loads a page on your site, this code executes in their browser and records information like which page they viewed, how long they stayed, where they came from, and what device they’re using.
The code looks something like this:
html
<!-- Google tag (gtag.js) -->
<script async src="https://www.googletagmanager.com/gtag/js?id=G-XXXXXXXXX"></script>
<script>
  window.dataLayer = window.dataLayer || [];
  function gtag(){dataLayer.push(arguments);}
  gtag('js', new Date());
  gtag('config', 'G-XXXXXXXXX');
</script>
Your specific code will include your unique Measurement ID (the part that looks like G-XXXXXXXXX). This ID connects the data collected from your website to your specific GA4 property.
What makes GA4 code different from older tracking codes:
Google Analytics 4 uses a different code structure than Universal Analytics (the older version). If you previously had Universal Analytics installed with a tracking ID starting with “UA-“, you’ll need to add the new GA4 tracking code separately. The two systems can run side by side during a transition period, but GA4 uses the newer “gtag.js” library while Universal Analytics used “analytics.js.”
Where to Add Google Analytics Code
For the GA4 tracking code to work correctly, it needs to load on every page of your website before any content renders. This is why Google recommends placing it in the <head> section of your HTML, as close to the opening <head> tag as possible.
Why the <head> section matters:
When a browser loads a webpage, it reads the HTML from top to bottom. The <head> section loads first, before the visible content in the <body> section. By placing your Google Analytics code for website tracking in the <head>, you ensure:
- The code loads immediately when someone visits
- You capture data even if visitors leave quickly (bounce rate accuracy)
- Page timing measurements are more accurate
- The code runs before other scripts that might depend on it
The ideal placement:
<!DOCTYPE html>
<html>
<head>
    <meta charset="UTF-8">
    <title>Your Page Title</title>

    <!-- Google Analytics code goes here -->
    <!-- Right before the closing </head> tag -->

</head>
<body>
    <!-- Your page content -->
</body>
</html>
You should add the tracking code to every page on your site. For most websites, this means adding it to your site’s header template file so it automatically appears across all pages.
How to Get Your GA4 Tracking Code
Before you can install anything, you need to get your specific GA4 tracking code from Google Analytics. Here’s how to find it:
Step 1: Access Your GA4 Property
- Go to analytics.google.com
- Sign in with your Google account
- Select the GA4 property you want to track (if you have multiple properties)
Step 2: Navigate to Data Streams
- Click the Admin gear icon in the bottom-left corner
- In the “Property” column (middle column), click Data streams
- Click on your website’s data stream (if you just created your property, you should have one stream listed)
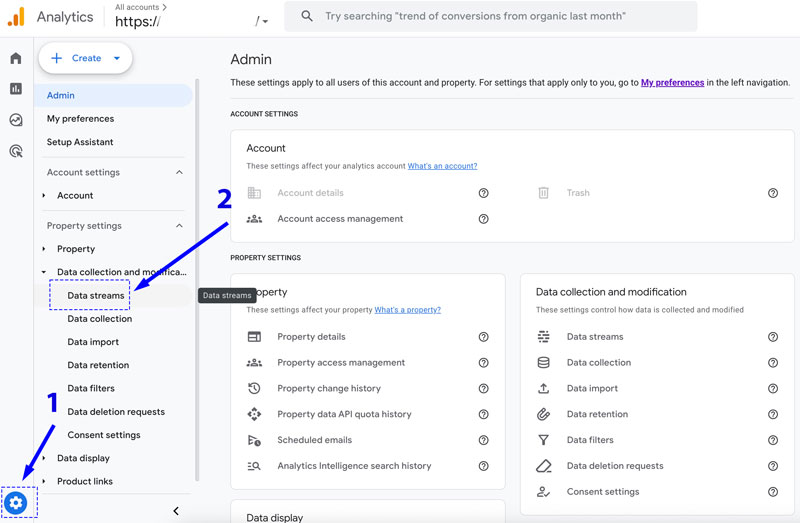
Click on your website’s data stream
Step 3: View Your Tagging Instructions
- On the data stream details page, look for the Measurement ID at the top (format: G-XXXXXXXXX)
- Scroll down and click View tag instructions in the “Google tag” section
- Select Install manually
- You’ll see your complete GA4 tracking code displayed
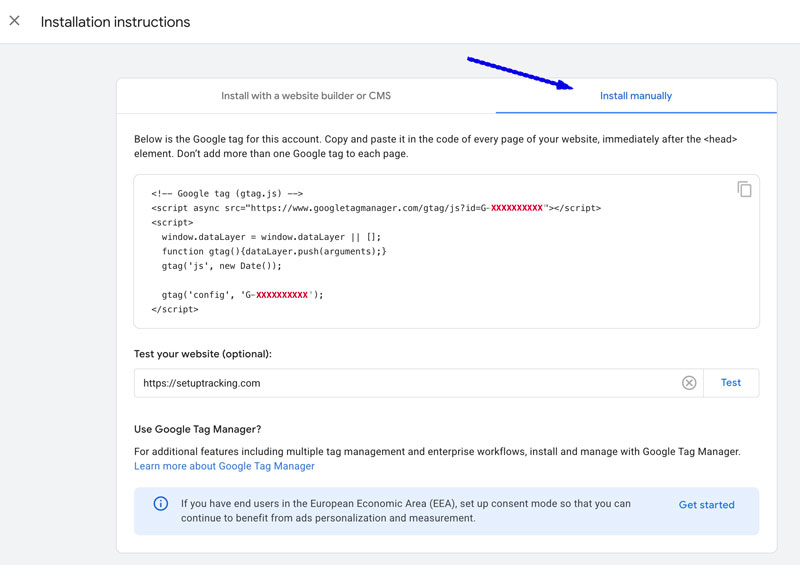
Step 4: Copy Your Code
Click the Copy icon in the top-right corner of the code box. Your GA4 tracking code is now copied to your clipboard and ready to paste into your website.
Important: Keep this browser tab open while you complete the installation so you can easily reference your Measurement ID.
Method 1: Add Google Analytics Code to HTML Website
If you have direct access to your HTML files, adding the GA4 tracking code is straightforward but requires some technical comfort with editing code.
Step 1: Locate Your Header Template
For most websites, there’s a header template file that’s included across all pages. Common file names:
header.htmlheader.phphead.html_header.htmlindex.html(for single-page sites)
The exact location depends on your site’s structure:
- Static HTML sites: Each HTML file individually
- PHP sites: Usually in an includes or templates folder
- Custom CMS: Check your theme or template directory
Step 2: Open the File for Editing
- Connect to your website via FTP (using FileZilla, Cyberduck, or your hosting control panel’s file manager)
- Navigate to your site’s root directory or theme folder
- Download a backup copy of the file you’re about to edit
- Open the header template file in a text editor
Step 3: Insert the GA4 Tracking Code
- Find the
<head>tag near the top of the file - Scroll down to locate the
</head>closing tag - Paste your complete GA4 tracking code right before
</head> - Save the file
Example of correct placement:
html
<!DOCTYPE html>
<html lang="en">
<head>
    <meta charset="UTF-8">
    <meta name="viewport" content="width=device-width, initial-scale=1.0">
    <title>My Website</title>
    <link rel="stylesheet" href="styles.css">

    <!-- Google tag (gtag.js) -->
    <script async src="https://www.googletagmanager.com/gtag/js?id=G-XXXXXXXXX"></script>
    <script>
      window.dataLayer = window.dataLayer || [];
      function gtag(){dataLayer.push(arguments);}
      gtag('js', new Date());
      gtag('config', 'G-XXXXXXXXX');
    </script>

</head>
<body>
    <!-- Your page content -->
</body>
</html>
Step 4: Upload and Test
- Upload the modified file back to your server (overwriting the old version)
- Clear your browser cache
- Visit your website to test (see verification section below)
For single-page applications (React, Vue, Angular):
Modern JavaScript frameworks require different implementation approaches. Instead of adding the code directly to index.html, you’ll typically:
- Install a GA4 library specific to your framework (
react-ga4,vue-gtag, etc.) - Initialize tracking in your app’s main component
- Set up route change tracking manually
The specific implementation varies by framework and is beyond the scope of this basic guide.
Method 2: How to Connect Google Analytics to Website Using Google Tag Manager
Google Tag Manager (GTM) is a popular alternative to hard-coding the GA4 tracking code. It requires more initial setup but offers significant advantages for managing multiple tracking codes.
Benefits of using GTM:
- Add or modify tracking without editing website code
- Manage multiple analytics and marketing tags from one interface
- Implement advanced event tracking (button clicks, form submissions) more easily
- Test changes before publishing
Prerequisites
Before you start:
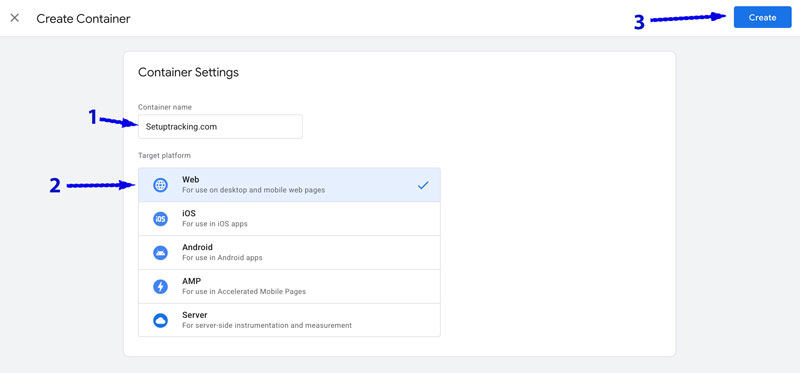
- You need a Google Tag Manager account and container created
- The GTM container code must already be installed on your website
- You need your GA4 Measurement ID (G-XXXXXXXXX)
Step 1: Access Your GTM Container
- Go to tagmanager.google.com
- Select the container for your website
- You’ll see the GTM workspace interface
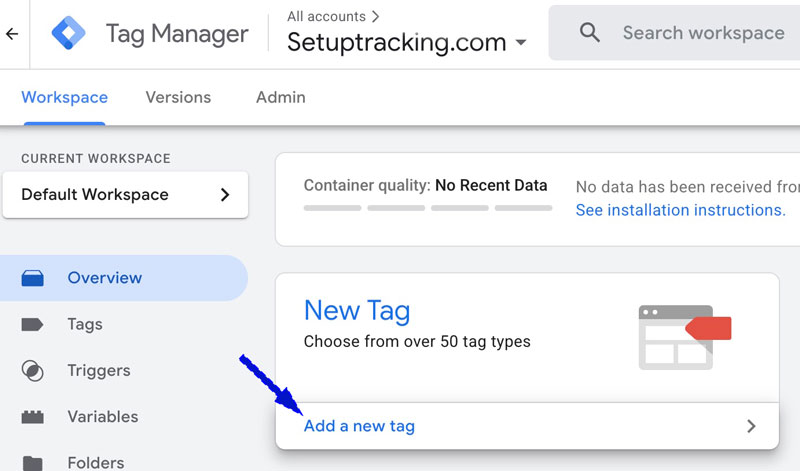
Step 2: Create a New Tag
- Click Tags in the left sidebar
- Click the New button in the top-right corner
- Click the Tag Configuration area in the top section
Step 3: Select the Google Tag Type
- In the tag type selection menu, scroll to find Google Analytics
- Click Google Tag (this is the GA4 tag type)
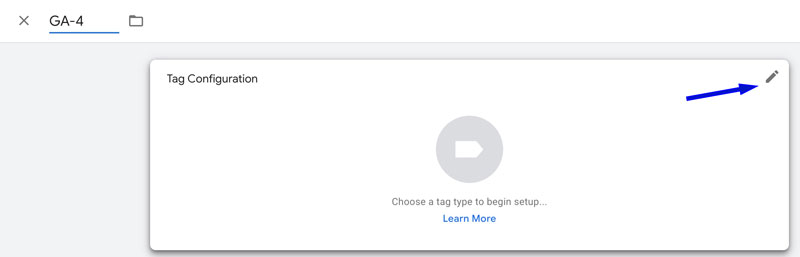
The tag configuration options will appear.

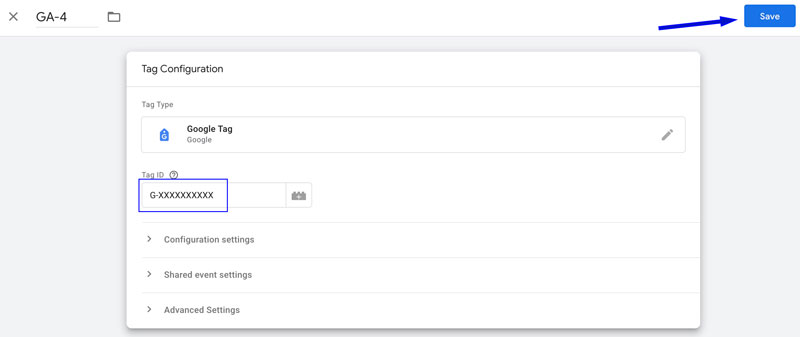
Step 4: Enter Your GA4 Measurement ID
- In the Tag ID field, paste your GA4 Measurement ID (G-XXXXXXXXX)
- Leave other settings at their defaults for now
Step 5: Set Up the Trigger
- Click the Triggering section at the bottom of the tag configuration
- Select Initialization – All Pages from the trigger list
- This ensures your GA4 tag fires on every page load
Why “Initialization – All Pages”?
This trigger fires before the page fully loads, which is optimal for GA4. It’s better than “All Pages” (which fires after the page loads) because it captures data even if visitors leave quickly.
Step 6: Name and Save Your Tag
- Click the tag name area at the top (it says “Untitled Tag”)
- Name it something clear like “GA4 – Main Configuration”
- Click Save in the top-right corner
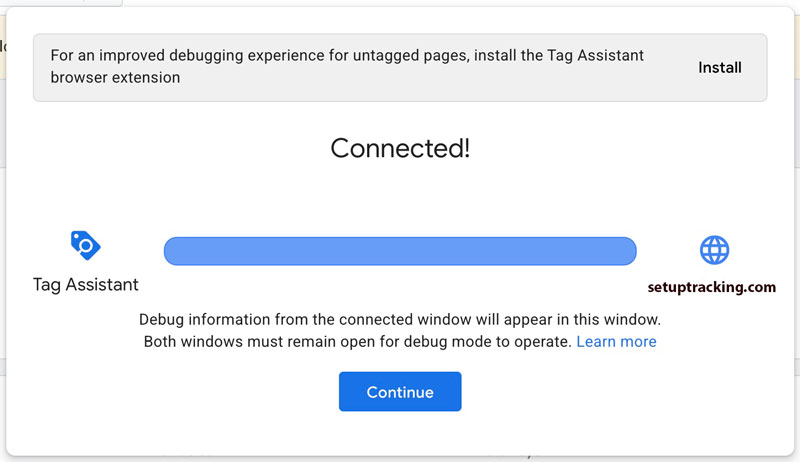
Step 7: Test Before Publishing
- Click Preview in the top-right corner of GTM
- Enter your website URL in the Tag Assistant window
- Click Connect
- Your website will open in a new tab with GTM debugging active
- Verify that your “GA4 – Main Configuration” tag shows as “Fired” in the Tag Assistant panel
Step 8: Publish Your Changes
- If everything looks correct in Preview mode, close the preview
- Click Submit in the top-right corner of GTM
- Add a version name like “Added GA4 tracking code”
- Click Publish
Your GA4 tracking is now live through Google Tag Manager.
Important note: If you previously had the GA4 tracking code hard-coded on your website, you must remove it before publishing the GTM version. Running both simultaneously will cause duplicate data.
How to Verify Your GA4 Tracking Code Is Working
After installation, you need to confirm that your GA4 tracking code is actually collecting data. Here are three reliable verification methods.
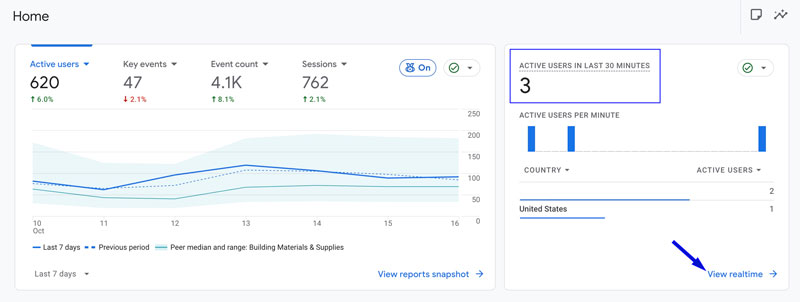
Method 1: Real-Time Report (Quickest)
- Go to your GA4 property at analytics.google.com
- Click Reports in the left sidebar
- Click Realtime (usually the first report option)
- In another browser tab or on your phone, visit your website
- Within 30 seconds, you should see yourself appear in the Realtime report
You’ll see:
- Current visitor count (should show at least 1—you)
- Your current page URL
- Your traffic source (likely “direct”)
- Your location and device information
If you don’t see yourself: Wait up to 60 seconds, refresh the Realtime report, and make sure you’re visiting the correct website. Also verify that you haven’t blocked Google Analytics with a browser extension or privacy tool.
Method 2: Browser Developer Tools
This technical method confirms the code is executing:
- Visit your website in Google Chrome
- Right-click anywhere on the page and select Inspect
- Click the Network tab in the developer tools panel
- Refresh the page
- In the filter box, type
collectorgtag - Look for network requests to
google-analytics.comorgoogletagmanager.com
If you see these requests, the tracking code is firing correctly.
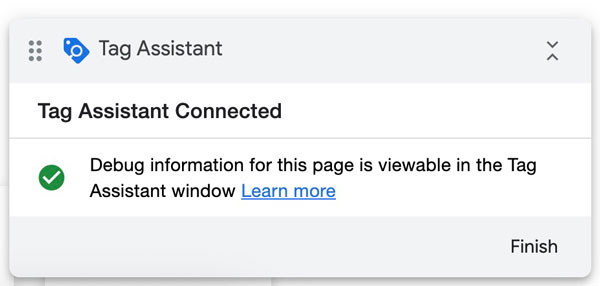
Method 3: Google Tag Assistant (Chrome Extension)
- Install the “Tag Assistant Legacy (by Google)” Chrome extension
- Visit your website
- Click the Tag Assistant icon in your browser toolbar
- Click Enable to start recording
- Refresh your page
- Click the Tag Assistant icon again
You should see your GA4 tag listed with a green or blue indicator, confirming it’s working.
How long until data appears in standard reports?
Realtime reports update immediately, but standard GA4 reports can take 24-48 hours to show data. This is normal—don’t panic if your Overview report is empty on day one.
Common Installation Issues and Solutions
Issue 1: “I don’t see any data in Google Analytics”
Possible causes and solutions:
Cause: Code not installed correctly or in wrong location
- Solution: Use browser developer tools to check if the gtag.js script is loading. View your page source (right-click > View Page Source) and search for your Measurement ID. If you don’t find it, the code isn’t on the page.
Cause: Ad blocker or privacy extension blocking tracking
- Solution: Try viewing your site in an incognito/private window or different browser. Many ad blockers prevent Google Analytics from working.
Cause: Wrong Measurement ID
- Solution: Double-check that the Measurement ID in your code matches the one in your GA4 property settings. It should start with “G-” not “UA-” or “GT-“.
Cause: Looking at wrong property
- Solution: Confirm you’re viewing the correct GA4 property in the property selector at the top of Google Analytics.
Issue 2: “Duplicate data or double counting”
Symptoms: Pageview numbers seem too high, or the Realtime report shows 2 users when only you are visiting.
Cause: GA4 code installed multiple times on the same page.
Common scenarios:
- Code hard-coded in header template AND added via Google Tag Manager
- Code appears in both header and footer
- Multiple GTM tags firing for the same property
Solution:
- View your page source and search for your Measurement ID
- Count how many times it appears—it should only appear ONCE
- Remove duplicate installations, keeping only one method
- If using GTM, remove any hard-coded GA4 snippets completely
Issue 3: “Tracking works on homepage but not other pages”
Cause: Code only added to index.html instead of to the header template file.
Solution: Make sure the tracking code is in a template file that’s included across all pages. For custom sites, this should be in your header include file that appears on every page.
Test by visiting various pages and checking the Realtime report—you should appear on each page you visit.
Issue 4: “GTM Preview mode won’t connect”
Possible solutions:
- Check that popup blockers aren’t preventing Tag Assistant from opening
- Make sure you’re using the same browser for both GTM and your website
- Clear your browser cache and cookies
- Disable browser extensions temporarily
- Try Chrome if using a different browser (GTM Preview works best in Chrome)
Issue 5: “Getting errors in browser console”
If you see JavaScript errors mentioning gtag or Google Analytics:
Check for:
- Typos in the Measurement ID
- Missing closing script tags in your code
- Conflicts with other JavaScript on the page
- Content Security Policy restrictions blocking Google scripts
View the exact error message in the browser console for specific troubleshooting guidance.
Best Practices for GA4 Code Installation
Naming Conventions
In Google Tag Manager: Use clear, descriptive names for your tags:
- ✅ “GA4 – Main Configuration”
- ✅ “GA4 – Page Views”
- ❌ “Tag 1”
- ❌ “Google Analytics”
In GA4: Name your data streams clearly:
- ✅ “Company Website – Production”
- ✅ “MyStore.com – Main Site”
- ❌ “Web”
Testing Procedures
Always test before deploying to production:
- Use GTM Preview mode if using Tag Manager
- Test in staging environment if available
- Verify Realtime report shows your test visits
- Check multiple pages to ensure site-wide installation
- Test on mobile device if your site is mobile-responsive
- Wait 24-48 hours and check standard reports
Maintenance Tips
Set calendar reminders to:
- Check for GA4 updates every quarter
- Review your tracking setup after major site changes
- Verify data is still flowing if you notice unusual traffic patterns
- Update measurement protocol if Google releases new features
Documentation: Keep a simple text file noting:
- Your Measurement ID
- Installation method used (direct HTML, GTM container ID, etc.)
- Installation date
- Who has admin access to your GA4 property
This saves significant time when troubleshooting issues months later.
Security Considerations
Don’t worry about exposing your Measurement ID—it’s designed to be public and visible in your page source. However:
- Keep your Google Analytics account password secure
- Limit admin access in GA4 to only those who need it
- Use two-factor authentication on your Google account
- Don’t share Google Analytics account credentials in plain text
Performance Considerations
The GA4 tracking code is designed to load asynchronously (notice the async attribute in the script tag), which means it won’t block your page from rendering. However:
- Load only one analytics tool at a time initially; add others after confirming the first works
- Avoid loading multiple tracking scripts if they measure the same thing
- Use GTM if you plan to add multiple marketing tags—it’s more efficient than loading 5-10 separate scripts
Frequently Asked Questions
Do I need to add the tracking code to every page?
Yes, the GA4 tracking code needs to be on every page you want to track. However, you don’t need to manually add it to each page individually. Instead, add it once to a template file that all pages use (like your header template), and it will automatically appear across your entire site.
Can I use Google Analytics without Google Tag Manager?
Absolutely. You can add the GA4 tracking code directly to your website without Google Tag Manager. For basic pageview tracking, adding the code directly is perfectly fine.
Consider GTM if you:
- Plan to add multiple tracking codes (Facebook Pixel, LinkedIn Insight Tag, etc.)
- Need advanced event tracking without developer help
- Want to modify tracking without editing site code
What’s the difference between the Measurement ID and Tracking ID?
Measurement ID (G-XXXXXXXXX): Used by Google Analytics 4
Tracking ID (UA-XXXXXXXX-X): Used by Universal Analytics (the older version)
If you’re setting up GA4, you need the Measurement ID starting with “G-“. The old UA- format won’t work with GA4 properties.
Will this slow down my website?
The GA4 tracking code has minimal impact on website speed. Google designed it to:
- Load asynchronously (doesn’t block page rendering)
- Be cached by browsers after first load
- Be served from Google’s fast CDN
In performance tests, the GA4 code typically adds less than 0.1 seconds to page load time, which is imperceptible to visitors.
Can I track multiple websites with one GA4 property?
Technically yes, but it’s not recommended. Each website should have its own GA4 property because:
- Reports will mix data from both sites, making analysis confusing
- You can’t separate traffic by website easily
- User counts will be inflated by people who visit both sites
Create separate GA4 properties for each website, then use a GA4 “rollup property” if you need combined reporting.
How do I remove old Universal Analytics code?
If you previously had Universal Analytics (UA-XXXXXXXX-X format) installed and you’re switching to GA4:
- Find where the old code is installed (check your header template file)
- Search for “analytics.js” or your old UA- ID
- Remove the old code completely
- Add the new GA4 code in its place
You can run both temporarily during migration, but long-term you should remove the old Universal Analytics code since that system stopped processing data in July 2023.
Should I use direct HTML installation or Google Tag Manager?
Use direct HTML installation if:
- You only need basic pageview tracking
- You rarely add new tracking codes
- You’re comfortable editing HTML
- You want the simplest possible setup
Use Google Tag Manager if:
Multiple team members need to manage tracking
You plan to add multiple marketing tags (Facebook, LinkedIn, etc.)
You need event tracking (clicks, form submissions, video plays)
You want to modify tracking without editing site code
Conclusion
You’ve now learned how to add the GA4 tracking code to your website using two proven methods. Here are the key points to remember:
Essential takeaways:
- The GA4 tracking code goes in the
<head>section of your website, right before the closing</head>tag - Your Measurement ID (G-XXXXXXXXX) is unique to your property and required for tracking
- Choose direct HTML installation for simplicity, or Google Tag Manager for flexibility and advanced features
- Always verify your installation using the Realtime report
- Never install the same tracking code twice—it causes duplicate data
Next steps:
Now that your GA4 tracking code is installed and working, you should:
- Wait 24-48 hours for initial data to populate standard reports
- Learn how to navigate the GA4 interface and reports
- Set up conversion tracking for important actions (form submissions, purchases, etc.)
- Configure user properties and custom dimensions if needed for your business
- Create custom reports focused on your specific goals
The foundation is set—your website is now collecting valuable visitor data that will help you understand your audience and improve your marketing efforts.